InDesign Paragraph and Character Styles for Translation
If you've ever received a translated InDesign file back from a linguist and found that all the formatting has collapsed — body text that's suddenly in a different weight, headings that lost their spacing, pull quotes that reverted to default — the culprit is almost always the same thing: a document that never used styles properly in the first place.
Paragraph and character styles are InDesign's most powerful formatting tool. They're also the most directly connected to translation quality. When a document uses real styles, IDML export is clean, the translator's CAT tool reads the text correctly, and reimporting translated content takes minutes. Without styles, the same job can take hours of manual reformatting — and it's billable time that gets passed back to your client.
This article explains what paragraph and character styles actually do inside an IDML file, where things go wrong in unstiled documents, and how to build a style architecture that makes multilingual DTP fast and predictable.
InDesign users preparing files for translation, translation agencies that review incoming files, and DTP studios handling multilingual layout. If you work with IDML, this is foundational knowledge.
What Happens When Styles Aren't Used
InDesign will let you format an entire document using nothing but local overrides — selecting text and hitting Bold, adjusting font size inline, dragging the leading slider manually. The document looks identical on screen. The problems only appear when you try to translate it.
When an IDML file is opened in a CAT tool (SDL Trados, memoQ, Phrase, etc.), the tool reads the underlying XML. It sees every formatting tag as a code that wraps the translatable string. A sentence formatted entirely with local overrides might look like this to the translator:
What a translator sees in a non-styled document
- Opening tag: font name, size, leading, tracking, kerning, colour — all as inline properties
- The translatable string — often just a few words
- Closing tag — same properties repeated
- Any bold word gets its own nested tag pair with full properties again
- Result: a segment surrounded by dozens of formatting codes the translator cannot delete
This creates two problems. First, the translator has to carry every formatting tag through to the target language, which significantly increases the chance of accidentally deleting or corrupting one. Second, the IDML reimport doesn't know what style the text is supposed to have, so any text expansion or contraction that forces a reflow will produce raw, unstyled text that has to be manually reformatted.
- IDML full of inline formatting tags
- Translator works around dozens of codes
- Tag errors corrupt formatting on reimport
- Text reflow loses all formatting
- Manual reformatting after every language
- Hard to update design across languages
- IDML uses style references, not inline tags
- Translator sees clean, minimal markup
- Tag errors are rare and easy to fix
- Reflowed text inherits style automatically
- Formatting is correct on first reimport
- One style update propagates to all languages
Reformatting a single 24-page brochure manually across five languages after translation is typically 6–10 hours of DTP work that could have been avoided entirely by spending 30 minutes setting up styles before the job started.
Paragraph Styles vs Character Styles — What's the Difference
These two style types work at different levels and serve different purposes. Mixing them up is one of the most common causes of style-related formatting problems in translated files.
Paragraph styles
A paragraph style applies to an entire paragraph — from the moment the cursor enters that paragraph to the next return character. It controls everything: font, size, leading, alignment, spacing before and after, indents, tab stops, hyphenation, language, and OpenType features. When you apply a paragraph style, all of those properties update at once.
Paragraph styles are the backbone of any translatable document. Every distinct type of text element in your layout — body copy, headline, subhead, caption, footnote, pull quote, table header, table body — should have its own named paragraph style.
Character styles
A character style applies only to a specific range of characters within a paragraph, overriding just the properties you define. A character style for bold emphasis might only specify font weight — everything else inherits from the underlying paragraph style.
Character styles are what allow you to mark up individual words or phrases (bold terms, italics, hyperlinks, product codes in a different typeface) without wrapping them in a full paragraph style. In IDML, character styles produce a clean, minimal tag that's easy for CAT tools to handle.
Paragraph styles for the container. Character styles for the exception. Never use a character style to format an entire paragraph, and never use local overrides where a character style would do.
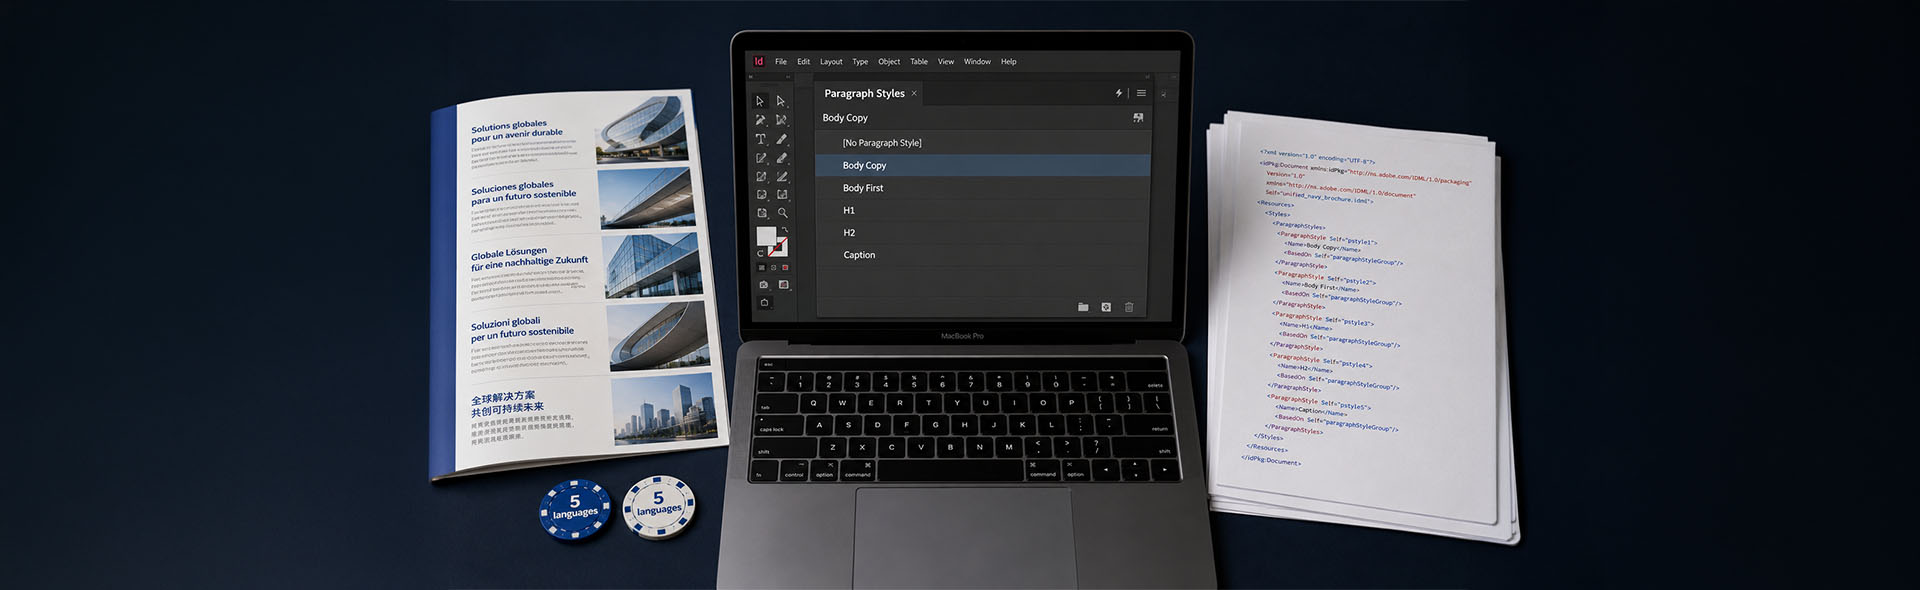
What Styles Actually Look Like in the IDML File
IDML is a ZIP archive of XML files. The styles panel in InDesign directly corresponds to entries in the Resources/Styles.xml file inside that archive. When you export to IDML and a translator opens it, this is the structure their CAT tool is reading.
A paragraph styled with a named paragraph style produces a story XML element like this (simplified):
<CharacterStyleRange AppliedCharacterStyle="[No character style]">
<Content>Your translatable text here.</Content>
</CharacterStyleRange>
</ParagraphStyleRange>
PointSize="10" Leading="14" Tracking="0" Kerning="Metrics"
AppliedFont="Helvetica Neue" FontStyle="Regular"
FillColor="C=0 M=0 Y=0 K=100" HorizontalScale="100">
<CharacterStyleRange AppliedCharacterStyle="[No character style]"
PointSize="10" Leading="14">
<Content>Your translatable text here.</Content>
</CharacterStyleRange>
</ParagraphStyleRange>
The named-style version gives the CAT tool a single reference. The override version buries the content in a wall of inline properties — all of which become formatting tags in the translation interface. The translator has to preserve every one of them or the layout breaks on reimport.
How to Build a Translation-Ready Style Architecture
Setting up styles properly before a multilingual project takes between 20 and 60 minutes depending on document complexity. It saves that time many times over across every language delivered.
1. Plan your style map first
Before opening the Paragraph Styles panel, list every distinct text element in the document. A typical brochure might have: body copy, body copy first paragraph (no indent), headline, subheadline, standfirst, caption, footnote, pull quote, sidebar body, sidebar heading, table header, table body, bullet item, numbered item, and page number. Each gets its own style.
Use consistent, descriptive names that make sense to someone else opening your file. Prefix styles by category: Body/Body Copy, Body/Body First, Head/H1, Head/H2, Caption/Standard. Nested groups appear as folders in the Styles panel and keep large documents manageable.
2. Build a parent–child hierarchy
InDesign styles support inheritance via the "Based On" setting. A parent style — say, Body/Body Copy — defines the base: font family, size, leading, colour. A child style like Body/Body First inherits everything from the parent and only overrides the first-line indent. When you change the font in the parent, every child updates automatically.
This hierarchy is critical for multilingual work. When you adapt a layout for a new language — switching from a Latin font to a CJK font, for example — you change one parent style and the entire document reflows correctly. Without a hierarchy you'd update every style individually.
Creating a parent–child style pair in InDesign
- Open the Paragraph Styles panel via
Type → Paragraph Styles - Create your base style: double-click
[Basic Paragraph]and configure it — or create a new style from scratch - Create the child: click the New Style icon, then in the style options set
Based Onto your parent style - Override only the properties that differ from the parent in this child style
- Test: change the font in the parent and confirm the child updates automatically
3. Set the language attribute per style
Every paragraph style in InDesign includes a Language field under Advanced Character Formats. This controls which hyphenation dictionary and spell-checker InDesign applies. For source document styles, set this to your source language. When creating language-specific versions of a document, duplicate the style set and update the Language field in each style — this is what allows InDesign's composer to hyphenate German correctly while the English version hyphenates differently in the same layout.
The Language field is separate from any text direction setting. For RTL languages like Arabic or Hebrew, you also need to set the paragraph direction to Right-to-Left under the Paragraph panel — the language field alone doesn't control text direction. See our guide to RTL setup in InDesign for the full process.
4. Handle emphasis with character styles, not bold buttons
Every time you select text and press Cmd+B (or the Bold button in the Control bar), InDesign applies a local override. In the IDML, this becomes an inline formatting tag. Instead, create character styles for every emphasis pattern you use:
- Bold emphasis — sets font weight only, inherits everything else
- Italic emphasis — sets font style only
- Hyperlink — colour and underline, no other properties
- Code / monospace — font family override only
- Small caps — OpenType feature only
- Superscript / footnote reference — baseline shift and size
Translators using CAT tools can collapse character style tags to a single inline code. Local override tags cannot be collapsed — they remain as multiple nested tags that are easy to accidentally corrupt.
5. Eliminate local overrides before export
Before exporting to IDML for translation, check the document for stray local overrides. Any paragraph that has overrides applied on top of a style shows a small plus (+) symbol next to the style name in the Paragraph Styles panel when the cursor is in that paragraph.
Finding and clearing local overrides
- Open
Edit → Find/Change(Cmd+F) — useful for text-based overrides, but not all - Better: use the
GREPtab in Find/Change to locate paragraphs applied with[Basic Paragraph]— this catches unstyled text - For visual inspection: click into any paragraph with a (+) in the Styles panel, then use
Option+clickon the style name to clear character overrides, orAlt+clickto clear paragraph overrides - For a full document audit:
Edit → Find/Change → Objecttab lets you find frames with specific style conditions - Third-party scripts like
FindChangeByListcan batch-process override removal across large documents
Select all text in a frame (Cmd+A), then look at the Paragraph Styles panel. If you see a (+) next to a style name, there are overrides. The goal before IDML export is zero (+) symbols across the document — or at minimum, all remaining overrides converted to named character styles.
A Standard Style Architecture for Multilingual Documents
The table below shows a starting-point style set for a typical multilingual brochure or report. Adapt the naming and properties to your brand — the structure is what matters.
Style Health Check Before Sending to Translation
Run through this checklist on any InDesign file before exporting the IDML for a translation job. It takes under ten minutes and prevents the majority of post-translation formatting problems.
The Short Version
Paragraph styles define the formatting of every text element in an InDesign document — headline, body, caption, table cell. Character styles handle inline exceptions — bold, italic, hyperlinks. Together they replace local overrides, which are the primary cause of formatting corruption in translated InDesign files.
In IDML, a properly styled document produces clean XML with style references instead of inline property tags. This reduces the number of formatting codes a translator has to handle, dramatically lowering the risk of tag errors, and it means that when translated text is reimported, InDesign can reflow it automatically using the correct styles — no manual reformatting required.
The investment is 30–60 minutes before translation begins. The payoff is clean, predictable layout across every language in the job. If you're regularly sending files to translation without a full style architecture in place, that's where your post-translation DTP hours are going.
Styles work in combination with how your IDML is structured. See our guides on INDD vs IDML for translation, fixing overset text after translation, and preparing an InDesign file for translation for the full picture.
Further Reading
Need a translation-ready InDesign file prepared?
We audit InDesign files for translation readiness, build style architectures from scratch, and handle the full multilingual DTP workflow — IDML export through to final print-ready files in every language.
Get in touch →